


Description
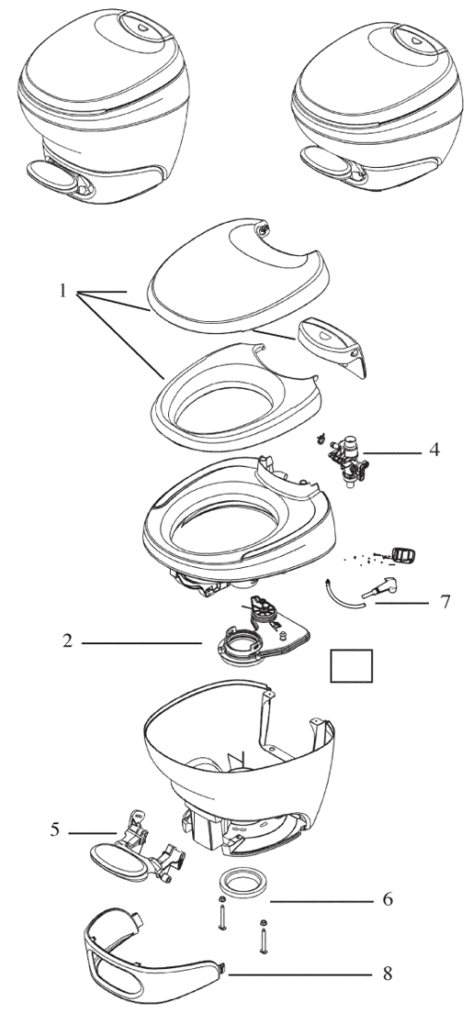
Parts List
| Key No. | Part No. | Description |
|---|---|---|
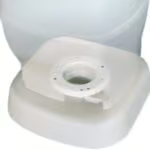
| 1 | 36766 | Seat Cover and Pod – White |
| 36767 | Seat Cover and Pod – Parchment | |
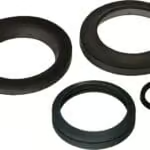
| 2 | 31111 | Mechanism Service Package (includes mechanism assembly and closet flange seal) |
| 4 | 31113 | Water Module Service Package (includes water module 2 screws and link retainer clip) |
| 5 | 33372 | Pedal Service Package (includes pedal 2 link retainer clips 2 screws and return spring) – White |
| 33386 | Pedal Service Package (includes pedal 2 link retainer clips 2 screws and return spring) – Parchment | |
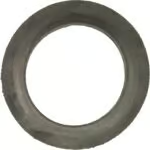
| 6 | 31115 | Closet Flange Seal Service Package (includes closet flange seal 2 closet bolts and 2 nuts) |
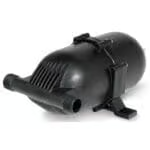
| 7 | 33226 | Water Saver Service Package (includes water saver 2 hose clamps link retainer clip water saver clip wall mount bracket and 2 screws) – White |
| 8 | 33380 | Shroud (high profile) – Parchment |
| 33382 | Shroud (low profile) – Parchment | |
| 33381 | Shroud (high profile) – White | |
| 33383 | Shroud (low profile) – White |
Not Listed
| Part No. | Description |
|---|---|
| 33223 | Clip for Water Saver – Parchment |
| 33227 | Clip Pkg for Water Saver – Parchment |
| 33224 | Clip for Water Saver – White |
| 33228 | Clip Pkg for Water Saver – White |
| 31112 | Mechanism Repair Kit (Not Shown) (includes blade seal hub seal mechanism seal closet flange seal and link retainer clip) |
From the Manufacturer

About Thetford
As the manufacturer of mobile sanitation products for the RV, marine, camping and truck markets, Thetford makes mobile living a more pleasant experience. Thetford products include complete lineups of:
- Lightweight, low-water-use toilets permanently mounted in RVs, boats or trucks
- Hand-carried, fresh-water-flush, self-contained portable toilets that have a multitude of uses
- Specially formulated waste holding tank deodorants and treatments used with these toilets
- Innovative, multi-capacity tote tanks
- Other products that make mobile living more convenient, quicker, cleaner and easier


Amazon Customer –
Fini les fuites. No more leaks4 pièces, 2 beignes, le blade seal et le mini seal du ressort pour toutes les Bravuras. Facile à installer et elle fonctionne comme une neuve.Easy to install made my Bravura RV like new. No more leaks. 4 peaces
joanne –
Perfect fit.Perfect fit for my 2003 fifthwheel Thetford Bravura toilet. I watched a YouTube video that help greatly. It s not a difficult job with the step by step video. All gaskets fit to perfection. Very fast delivery.
D. Irvin –
spend $40 instead of $200. I hour job.EXACTLY what is needed to rebuild Thetford Bravura. Detailed instructions included. Pivot hub seal even came pre-pubricated. Also, “Closet Seal” (to seal the toilet to black tank) is included, so you you don’t need a seperate one. 5 stars. The only thing not included is bleach for cleaning and common sense to not over-tighten hardware on plastic toilet. Other than that you should be good to go!
RC More –
It worksI could not tell a difference between the two large seals. One for the floor and the other for sealing top and bottom toilet pieces together.
Jim in Washington State –
Well thought out items providedEverything you need for proper service and repair. You can actually call these folks, and get someone on the phone that speaks english as a first language (not that I care, as long as I can understand them) – but VERY helpful, VERY knowledgeable, very happy with the experience- would love to have bought from local dealer – but hey, RV is a great 2nd source.
Channing Fell –
Royal flushThe package had all the necessary seals. The seals did not seem to be “fresh”, but this is my second kit in 9 years. Use quality plumbers silicone grease will make things go together easily and enhance seal
leo wink –
Good fit, good instructions.Everything fit perfectly, the instructions were truly helpful. I spent more time cleaning the components than I did doing the install…it was a snap. I do recommend some plumber’s grease for the blade valve seal and the hub seal. I’d pay a buck more if the kit came with a little dab of it.
Michael Ogles –
Great fit and solved the problemWe were getting black tank odors in the bathroom anytime we turned the fan on. I had already replaced the air admittance valve and checked the van for this seem like the only source for the problem. Easy replacement. Even found a YouTube video showing my exact model and how to replace seals.
G. Kinsey –
Solved the Problem Completely!We had a slowly leaking water seal and I tried all of the solutions I could find (cleaning with a plastic tool, soaking and lubricating with some special toilet seal stuff. . .) Finally, I bought this kit. 4-1/2 hours later, moving along at an easy pace, I have a sparkling clean toilet that functions like new. And has held water in the bowl for three weeks now. The project took me a while as I took my time, double-checking each step as I didn’t want to botch it. Plus, it took a while to completely clean everything and let it dry in the sun. The instructions that accompanied the kit were way above par, excellent. I took snapshots of things along the way, which did help me figure a couple of reassembly steps with the linkage. I suggest the reader do that, too.
Another Kindle Customer –
The only other thing you need is a large trash bag!There is an excellent how-to on YouTube on repairing the associated toilet. Watch it once all the way through, then run it on a tablet as you work on the toilet and pause as needed. No other parts are needed, this kit is complete including the bottom floor gasket. Took me about an hour and a half on my first (successful!) attempt as we had a nasty larval infestation all around the base of the toilet that needed intense cleaning (bleach, rags, and water)!Add a large, new, trash bag to your list of disposables and after you undo the nuts on the bottom, and disconnect the water supply, put the bag over the entire toilet, pick it up, flip it over, and then carry it outside for cleaning and repair. Just a suggestion to keep any collected waste, bugs, etc. from dripping across the RV as you transport it outside for cleaning!And for heavens sake, don’t forget to have a large red Solo cup handy! (see video!)